Tuesday, October 9, 2012

Mistaken Rib Scarf

I have been working on a scarf that I really like to make!  I have made several of them.  The pattern just appeals to me!
I found this pattern on Vickie Howell's blog.  Although she is using her Sheepish yarn, I am using Red Heart Super Saver in the colors of Black, Brown and White.
Makes for a very nice stylish scarf!
 

Materials

3 Balls (or up to 21!) Stitch.Rock.Love Sheep(ish) for Caron (30%Wool/70% Acrylic; 167 yds/154m) in assorted colors.
Size US 8 (5mm) Needles (knit version)
Size I (5.5mm) Hook (crochet version)
Tapestry Needle

Finished Measurements 5" x 61"

Gauge 25 sts = 4" (10cm) in mistake rib
Directions
CO 31 sts.
Row 1: *K2, p2; rep from *, ending with a k2, p1.

Row 2: Repeat Row 1 (These 2 rows make Mistake Rib Pattern)

Rows 3-252: Repeat last two rows, changing colors after every 6th row.

Note: If you’re duplicating my version exactly, you’ll use all 21 colors of Sheep(ish). The color pattern will be repeated twice, as a mirror image of itself as follows.
(Pictured scarf is folded in half.)

First half of scarf:

White(ish)
Grey(ish)
Gun Metal(ish)
Black(ish)
Plum(ish)
Magenta(ish)
Red(ish)
Hot Pink(ish)
Pink(ish)
Taupe(ish)
Camel(ish)
Espresso(ish)
Pumpkin(ish)
Coral(ish)
Yellow(ish)
Lime(ish)
Chartreuse(ish)
Olive(ish)
Teal(ish)
Turquoise(ish)
Robin’s Egg(ish)

Second Half of Scarf:

Repeat pattern in the reverse order, beginning with Robin’s Egg(ish)--they’ll be an 12 row stripe of this color in the center of your scarf.

BO in pattern stitch.


Tip: This scarf would look great using only 4 colors, too! Either pic a contrasting palette, or else just choose a pairing of 4 from my scarf!


CROCHET VARIATION

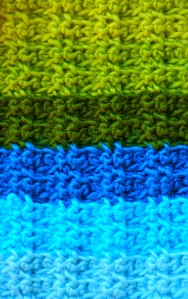
Gauge 18 sts = 4" 10(cm) in sc mistake rib

Directions Ch 24. Sc in 2nd ch from hook and to end. Turn (23 sts.)

Row 1: Ch1 (counts as sc in front loop), sc in FRONT LOOP of next st, *2sc in BACK LOOPS, 2sc in FRONT LOOPS; rep from * until last 3 sts, 2sc in FRONT LOOPS, sc in BACK LOOP.
 
Row 2: Rep Row 1. (These two rows make the mistake rib pattern)

Rows 3-252: Repeat last two rows, changing colors after every 6th row.
 
Tie off.
Single-Crochet Mistake Rib

Monday, October 8, 2012

Chunky Tomato Mushroom Sauce


Due to health issues, I have been modifying my diet.  We do not eat a lot of meat and or dairy any longer.  The only meats we consume is chicken and turkey.  BORING!!!!!!!!!!!!!!!   Trying to eat more vegetables, fruits and grains sounds easy. but it is far from it!  Early we had bean soup and for dinner we had pasta with sauteed onions, mushrooms and tomatoes.  Both were filling!!!  The strange thing, we have been doing this a little over a week, is that I've started seeing and feeling the results already.  Thought it would have taken at least a month to notice any real changes.  Not so!! 
Thought it would be nice to share a recipe of a similar sauce that we had for dinner.  To steal a phrase::::  Monday and Meatless!! lol lol  Enjoy!!

Chunky Tomato Mushroom Sauce

The Washington Post, December 2, 2009
  • Course: Condiment
  • Features: Meatless, Make-Ahead Recipes

Summary:

Use kitchen shears to cut the tomatoes before removing them from the can. Serve over cavatappi or rotini.
MAKE AHEAD: Divide the cooled sauce between 2 large freezer-safe resealable plastic food storage bags; seal with a little room for expansion and freeze flat, for up to 3 months.
Makes about 5 cups
Ingredients:
  • • 1/4 cup extra-virgin olive oil
  • • 1 medium onion, cut into small dice (1 cup)
  • • 4 medium cloves garlic, minced
  • • 1 6-ounce can tomato paste
  • • 2 28-ounce cans whole tomatoes, chopped, with their juices
  • • 12 ounces mushrooms, cut into large pieces
  • • 1/2 teaspoon dried tarragon
  • • 1/2 teaspoon dried oregano
  • • 1 tablespoon sugar
  • • 1 teaspoon sea salt
  • • Freshly ground black pepper
Directions:
Heat the oil in a large skillet over medium heat. Add the onion and cook for about 5 minutes, stirring occasionally, until softened. Add the garlic and cook for 3 minutes, stirring once or twice, then add the tomato paste and cook for 2 minutes, stirring. Add the tomatoes with their juices and the mushrooms; increase the heat to medium-high and bring to a boil. (Watch out for sputtering sauce; you might wish to partially cover the skillet.)
Add the tarragon and oregano, then reduce the heat to medium-low; partially cover, and cook for 20 minutes, stirring occasionally.
Add the sugar, salt and the pepper to taste; mix well. The sauce is ready to use; or let cool, then store flat in freezer-safe resealable plastic food storage bags, leaving room for expansion.

Recipe Source:

Adapted from "500 Best Sauces, Salad Dressings, Marinades & More," by George Geary (Robert Rose, 2009).
24 calories, 0g fat, 0g saturated fat, 0mg cholesterol, 193mg sodium, 5g carbohydrates, 1g dietary fiber, 3g sugar, 1g protein.

Saturday, October 6, 2012

Calendula


Calendula (Calendula officinalis [Latin]), also known as pot calendula and pot marigold, is an orange or yellow flower native to the Mediterranean. Calendula is easy to grow from seed, but although it is sometimes referred to as marigold it should not be confused with regular French or African marigolds that are commonly used in gardens (Tagetes species). Calendula’s orange petals are thought to be antibacterial and anti-inflammatory, two traits that have made this flower a popular treatment for a host of bodily infections. 

Calendula is often recommended for treatment of ear infections. Studies have shown calendula offers as much pain relief for ear infection as some non-herbal eardrops. One popular combination herbal product Otikon Otic (which includes calendula), has been shown effective alternative treatment for chronic ear pain in doses 5 drops placed in the affected ear 3 times daily. 

Calendula washes may also be useful in treating chronic conjunctivitis. They antibacterial and anti-inflammatory effects of calendula both soothe the inflammation and help kill unhealthy bacteria are in the membranes surrounding the eye. 

Some research suggests that calendula extracts may also reduce inflammation when applied to the skin. In Germany, some doctors apply preparations of the herb to surgical incisions and other wounds that are slow to heal; studies indicate that this herb both reduces healing time and increases the quality of healing. Calendula also stimulates the production of collagen, and is used in many cosmetic creams to lessen the appearance of wrinkles and hydrate skin. Calendula ointments are available in 2% and 5% strengths, and have been used topically to treat pain and inflammation resulting from a variety of conditions, including hemorrhoids, vaginal itching caused by menopausal tissue changes, insect bites, diaper rash, acne, eczema, and sunburn. People with gastrointestinal disorders may benefit from calendula as well. German studies have shown that calendula protects the lining of the stomach and intestines by inhibiting the prostaglandin E1 (PGE), which causes swelling and inflammation, and by limiting the effects of Helicobacter pylori, a bacterium associated with gastritis, peptic ulcers, and stomach cancer. 

Calendula flowers are edible, and may be added to salads or cooked foods. They can also be dried for use in teas or gargles for sore throat or inflammations of the mouth; or in infused oils, creams, or ointments for treatment of minor skin injuries or irritations. 

You can make and store calendula tea in your refrigerator as a soothing skin treatment; try swabbing it directly on inflamed skin (acne, hemorrhoids, etc.). Some people may have an allergic reaction to calendula, especially those who are allergic to other members of the aster family, such as ragweed. It’s best to do a spot-test before using this or any other herbal medication.

Friday, October 5, 2012

How to Make Homemade Almond Milk

How to Make Homemade Almond Milk

From Frugally Sustainable:   http://frugallysustainable.com/2012/08/how-to-make-homemade-almond-milk/


I love almond milk.
But you know what I love more…homemade almond milk.
You can absolutely drive out to your local store and buy almond milk – but once you’ve had it fresh, the rich taste will keep you coming back for more! And guess what? It’s super easy to make.
Let me show you how.
Homemade Almond Milk
Ingredients
-pure, filtered water for soaking
-1 cup raw, organic almonds
-4 cups pure, filtered water
Optional Add-Ins
-sweetener to taste (i.e. maple syrup, honey, stevia, or my ultimate fave…4-6 medjool dates)
-homemade vanilla extract (I like to add 1 teaspoon to the mix)
-carob powder (Chocolate almond milk anyone!?!)
-spices (i.e. cinnamon, allspice, cloves, cardamon…get creative)
Method

1. Allow the almonds to soak covered in pure, filtered water for up to 48 hours in the refrigerator. Overnight will do, if you’re in a pinch. But, I like to give mine a good couple of days.

2. After soaking, strain the soaked almonds and toss the soaking water.

3. Place your almonds, four cups of pure, filtered water, and any optional add-ins in a high-speed blender — I love my Vitamix for this — and blend on high until the mixture becomes frothy…approximately 1-2 minutes.

4. Pour the contents of the blender through a cheese cloth lined strainer — or if you have one, a nut milk bag — into a 1 quart glass canning jar. Squeeze to extract all the goodness of the almond meal.
5. Store the milk in the refrigerator. It should keep for up to 3 days. Shake the jar prior to use.
Note

I don’t like the idea of wasting all of that almond meal/pulp. Now granted, most of the nutrients are gone into the milk, but I still find it useful for recipes like these brownies…yum! Or you could dehydrate them for use as a coating for chicken and fish. Perhaps make almond butter. What about using them as a body or facial scrub?

Whit's Knits: Chevron Baby Blanket

Whit's Knits: Chevron Baby Blanket


If you lived through the 60s and 70s perhaps you have vivid memories of a chevron afghan. Perhaps you appreciated it at the time; were indifferent to it in the 80s; despised it in the 90s; and have developed a deep affection for it over the past decade, itchy acrylic, zany colors and all!
This knitted Chevron Baby Blanket makes some accommodations both for modernity and for babies. Instead of hard-to-cuddle acrylic, this 100% cotton blanket is as deep and soft and cozy as a cloud. And instead of fast food orange and kitchen appliance avocado, this version is a delicate spectrum of natural colors just right for babies!

The next generation of chevron blankets starts with Blue Sky Cotton. Loosely spun into a uniquely cozy cotton, this is one of our very favorite baby blanket yarns. For delicate skin, it's non-allergenic cotton, and for busy parents, it's machine washable (yay!).


The Materials


  • 7 skeins of Blue Sky Cotton, 100% Cotton. These colors, from the top, are: Lemongrass, Lemonade, Bone, Tulip, Drift, Sleet, and Graphite.

The Pattern

Gauge

3 stitches = 1 inch in garter stitch with yarn doubled

Finished Size

26 x 33 inches

Notes

For this pattern you'll use the Blue Sky Cotton doubled. The best way to double yarn is to pull one strand from the inside of the ball and one strand from the outside. If you don't have a swift and ball winder to wind a center-pull ball, never fear, you can do it by hand! Clickhere for a great video that shows you how!
If you want to change the sizing or use this stitch pattern for a different project, just cast on a multiple of 14 plus 2 stitches.

Begin

With the Lemongrass (doubled!), cast on 100 stitches. (Try not to leave too long a tail when you cast on. You'll probably need the entire skein to finish the first stripe. If you end up one row short, don't worry! No one will notice!)
**Row 1 (right side): K1, ssk, *k10, k2tog, ssk, repeat from * to last 13 stitches, k10, k2tog, k1. (86 stitches)
Row 2 (wrong side): K6, *knit into front and back (kfb) 2 times, k10, repeat from * to last 8 stitches, kfb 2 times, k6. (100 stitches)
Repeat Rows 1 and 2 nine more times***
Change to the Lemonade color and repeat from ** to ***.
Change to the Bone color and repeat from ** to ***.
Continue in this pattern for the next three colors, changing colors at the end of each 20 row section. The next color will be Tulip, followed by Drift, and then Sleet.
For the final color (Graphite), repeat Rows 1 and 2 nine times. Work Row 1 one more time.
Bind Off Row: Bind off 5 stitches, *(knit into the next stitch and leave the stitch on the left needle, bind off 1 stitch, knit into the back of the stitch, let the stitch off the left needle, bind off 1 stitch) 2 times, bind off 10 stitches, repeat from * to last 8 stitches, (knit into the next stitch and leave the stitch on the left needle, bind off 1 stitch, knit into the back of the stitch, let the stitch off the left needle, bind off 1 stitch) 2 times, bind off 6 stitches, pull the yarn through the last stitch.
Weave in the ends and you're all done!

Whiten clothes naturally with homemade bleach

Whiten clothes naturally with homemade bleach

http://thankyourbody.com/whiten-clothes-naturally-homemade-bleach/

Once upon a time a certain hippie-dancer-blogger-mom was doing laundry. Nothing new. Unfortunately, this certain hippie-dancer-blogger-mom wasn’t paying attention and somehow a pair of new blue jeans got mixed up with the whites. Whoops. Look who has a pile of grayish clothes now. Yeah. That would be me. Of course, in the “old days” I would have put the items back in the washing machine with some bleach… you know, the stuff we use to whiten clothes.

No more, my friends. No more.

I hope you guys won’t hate me for ratting out another common household product. I’ve already tattled on shampoo, fabric softener, tampons, and the like. Can’t I just leave bleach alone? But the truth is even bleach, a household chemical frequently used for generations, is not a great product to have around the house. Chlorine based bleach (oxygen based bleaches don’t fall into this same category) are really bad for you, your family, your pets, and the environment!

Why? Well, consider the following:

  • Bleach can often cause respiratory issues.
  • It can also cause burns to the skin and even nervous system damage.
  • Allergies and asthma are often irritated by bleach and can cause serious reactions in those who have problems with these conditions already.
  • Beyond causing its own problems, chlorine bleach also has some really dangerous potential reactions with other chemicals and materials.
  • Each year thousands of calls are made for help and of those calls about 1/4th of them are related to bleach and the household cleaners that contain them. Many of these accidents involve children and can be potentially fatal.
Yes, the simple stuff we use to whiten clothes is not safe. In fact, bleach can be deadly.
Okay, I know I’m sounding a little dooms-day here. And chances are if you use bleach you keep it in safe place and use it responsibly. That’s good. But is it enough?
Because bleach mixes so easily with so many other products that produce a wide range of toxins, we should be concerned. Many of the chemicals produced through chemical reactions with chlorine bleach are toxins that are known carcinogens. These chemicals build up in the environment. They get into the water and food supply, and increase our risk for many negative health issues. Once again we all have a part to play to keeping our world safe.

But it’s okay!

It’s easy to make your own bleach. You can disinfect your bathrooms, clean your toilets, and whiten your clothes naturally with homemade bleach.

Whiten clothes naturally with homemade bleach

Ingredients:
- 1 ½ cup 3% hydrogen peroxide
- ½ cup lemon juice
- Distilled water to fill a gallon jug
- 10 – 12 drops lemon essential oil
Instructions:
1. Mix all ingredients together in gallon jug. Gently shake to combine.
2. Use one cup of homemade bleach in your washing cycle to whiten clothes.
whiten clothes naturally with homemade bleach
As you can see it definitely brightened my whites. What about all those icky used-to-be-white-but-now-are-gray clothes? Well, they aren’t sparkingly white, but they do look better. I plan on giving them the homemade bleach treatment a few more times.

Easy Baby Bibs Knitting Pattern

Easy Baby Bibs Knitting Pattern

Baby bibs make a nice gift for a newborn. They knit up quickly and have tons of charm when customized with a sweet little heart or sailboat. Follow the chart to create the design, and this project will be smooth sailing all the way.

Size

7x7" (18x18cm)

What You'll Need

Yarn: 100% cotton light worsted weight or DK weight solid-color yarn, approximately 50 yards (46m) each bib (yarn A); 100% cotton light worsted weight or DK weight variegated yarn, approximately 25 yards (23m) each bib (yarn B)
We used: Tahki Cotton Classic (100% mercerized cotton; 108 yards [100m] per 13/4oz [50g] skein): #3847, 1 skein (blue bib); #3931, 1 skein (lavender bib); Tahki Tweedy Cotton Classic (100% mercerized cotton; 108 yards [100m] per 13/4oz [50g] skein): #474, 1 skein (boat); #473, 1 skein (heart)
Needles: US size 4 (3.5mm); US size 2 (2.75mm) circular, 24" (61cm) long
Notions: Stitch holder; tapestry needle

Gauge

26 stitches and 36 rows=4" (10cm) in stockinette stitch

Notes

  • The yarn is worked on small needles in order to produce a closely knit fabric so spills won't soak through easily.
  • When changing colors, drop the old color and bring the new color up from under the old color, twisting them together to avoid gaps. For the boat pattern you will need 2 balls yarn A and 1 ball yarn B. For the heart you will need 3 balls yarn A and 2 balls yarn B. Because these areas are quite small, you may choose to cut long lengths of yarn instead of winding smaller balls or bobbins.
Make the BibUsing yarn A and size 4 (3.5mm) needles cast on 31 stitches.Row 1 and all odd-number rows (wrong side): Purl all stitches.Row 2: Knit 1, make 1, knit 29, make 1, knit 1. (33 stitches)Row 4: Knit 1, make 1, knit 31, make 1, knit 1. (35 stitches)Row 6: Knit 1, make 1, knit 33, make 1, knit 1. (37 stitches)Row 8: Knit 1, make 1, knit 35, make 1, knit 1. (39 stitches)Row 10: Knit 1, make 1, knit 37, make 1, knit 1. (41 stitches)Work in stockinette stitch (knit on right side, purl on wrong side) for 7 rows more, ending with row 17.
View Enlarged Image Use this chart to make the sailboat motif on your bib.
Next row: Begin working motif (heart or sailboat) following the chart and using the intarsia method.
After finishing charted design, work 10 rows in stockinette stitch with yarn A.
View Enlarged Image Use this chart to make the heart motif on your bib.
Shape Neckline
Row 1 (right side): Knit 12, bind off 17, knit to end of row (12 stitches on each side of bind-off). Place first set of 12 stitches on stitch holder.
Rows 2, 4, 6, 8, 10, and 12: Purl.
Row 3: Bind off 2 stitches, knit 10.
Row 5: Bind off 1 stitch, knit to end of row. (9 stitches)
Row 7: Bind off 1 stitch, with 1 stitch already on right needle from bind-off, knit 5 more, knit 2 together. (7 stitches)
Row 9: Bind off 1 stitch, with 1 stitch already on right needle, knit 3 more, knit 2 together. (5 stitches)
Row 11: Bind off 1 stitch, with 1 stitch already on right needle, knit 1 more, knit 2 stitches together. (3 stitches)
Row 13: Slip 2 stitches as if to knit them together, knit 1, pass the 2 slipped stitches over the knitted one. Cut yarn, pull tail through last stitch and fasten off.
Rejoin yarn to 12 stitches on holder and knit other side, reversing shaping.

Edging and Ties

With right side facing, pick up 43 stitches along the neckline edge of bib using yarn B and size 2 (2.75mm) circular needles. Knit 3 rows. Bind off all stitches.
With circular needle and using knitted cast-on method and yarn B, cast on 50 stitches. With same needle and yarn and right side facing, pick up 140 stitches evenly along left edge, bottom, and right edge of bib. Cast on another 50 stitches on the end. Knit 3 rows.
Bind off all stitches. Weave in all ends to wrong side of work.